Monday 19 December 2011

And The fun Continues

Well I got so sidetracked working on the twelve tags that I didn't get anything else done. Now I find myself a week before Christmas and a whole lot of half finished projects..........Why does this always happen? Could it be that I'm a procrastinator? No that couldn't be it!
Do you ever wonder how those women on youtube manage to get projects done so fast, and they also work and have kids and the list goes on.......... Personally I believe that they are just finishing up last years projects and it looks like they have just whipped up these projects in an hour or two.
My problem is that even when I finish my projects I never remember to take pictures of it. Anyway I did have a small project that I finished and gave to one of the ladies that I crop with. I of course didn't get a picture of it but someone else managed to get one so I stole it and downloaded it to my computer. Is it stealing if it's a picture of your own work?
It's just a small mini album that I made using envelopes. I think that I did a pretty good job on the cover.

Monday 12 December 2011

I Can't Believe I Did the Whole Thing

Well I certainly finished this tag off with a bang! I had none of the stuff that was needed to make the this one. Actually I had a few of the things.... I had rock candy distress stickles and I had a tag, Oh and I had a trinket pin, picket fence distress stain and walnut stain distress ink. That was the extent of the supplies that I had. I substituted actual white tissue paper for the paper that Tim was using. I stamped my background on the actual tag with my script stamp. Then I stamped the tissue paper with my music stamp. I hand cut my letters and I made the snowflaky thingy out of different shapes that I die cut. The angel that I used was off of a Christmas Ornament that fell apart on me last year and for some reason I had it sitting on a shelf above me T.V. Obviously it was meant to be used on this tag.
Anyway I'm going to have to leave for work now.......... So here it is........... My very last tag in this series.

Sunday 11 December 2011

Do I Dare Say It?

I don't know............. I feel like its almost sacrilegious to say this but I'm not really thrilled with this tag. I wasn't all that keen to make this tag when I first looked at it. But I'm committed to making them all so I sat down and planned how best to do this. Now that I've said that and put it out into the universe I'm thinking that I may now have to fill a mini mister and start keeping it under my pillow. I've already had to advise someone to do that and so far it seems to have kept her safe so I'm hoping that it will work for me too!
Anyway, as is par for the course I really didn't have the supplies on hand to make this tag so I substituted a little of this and a little of that. Threw in a pinch of something completely different and made my tag.
I didn't have any glossy paper so I used just a regular tag (I've been cutting all of my tags out of old file folders, some kraft colour and some white. I used white today). I stamped out my Christmas tree and my sentiment and then inked them up. The tree is inked with evergreen bough and the sentiment is inked with festive berries. Then I inked up my background with faded jeans, weathered wood and iced spruce. Not exactly the most festive of colours but I thought they went well together.
Then came time for the whole shrinking thing. I don't have the ranger shrink plastic but I do have shrinky dink (whoever thought of that name? ) I've never used it before but there's no time like the present to experiment! Anyway since I don't have the melting pot (no surprise there I'm sure!) I decided to do it on the stove. I know hey... I astound myself with my daring. Thank god I don't have little kids to set an example for! Anyway I cut the shrinky dink (try saying that name with a straight face ) with the only Christmas die that I own. I used a Basic Grey sizzix ornament die. Then I dropped them into the melted utee and shrunk them. They turned out a little bit wonky but that's okay. Anyway I stuck down everything on the tag and called it a day!
So here is my offering for today......

So I finally had to purchase something!

So after many attempts of trying to work around the image transfer I finally had to concede defeat and go out to purchase some packing tape. Subsequently by the time I finally finished my tag I had to run to go to work ( I work nights!) so I couldn't post my tag yesterday.
I started off trying out several different work around for the transfer. The first was using the packing tape that I have but the big S's going through it just didn't do it for me. (Yep I have monogrammed packing tape from Michaels). Next I tried doing the image transfer by using the gel medium and attaching it to the back some acetate but every time I tried to use water to work the paper off of the image it just got the gel medium slippery and the whole image just went sliding off of it completely. Believe me the expletives exploding from the vicinity of my craft desk was definitely not my finest hour. My last attempt and albeit most feeble attempt was using scotch tape. I think I had already recognized the fact that I was going to have to buy some packing tape by this time.
Well by the time I finally was able to do some serious work on my tag time was running out before I would have to leave for work! Unfortunately that also meant that I was rushing through some of the steps and I completely forgot to heat set the stamped image. What was a beautiful stamped image of some poinsettia's in forest moss is now just a nondescript blob in the upper and lower corners of my tag. Oh well what's done is done and I console myself with the thought that it wasn't the focal image of the tag so it really doesn't matter. And as Tim always says... EMBRACE IMPERFECTION !!!! 

Friday 9 December 2011

Two Steps Backwards for Every One Step Forward!

So yesterday I was so proud of myself. Not only did I have at least 80% of the supplies for the tag I had managed to finish it in record time ( At least it was a lot less time then the rest of the tags has been taking me)
But for some reason I completely forgot to share the link for it on Tim's site.
Just to clarify something here I want to point out that the reason that I started this blog in the first place was to participate in doing the tags, chronicle my journey and to share a link on Tim's site. I guess its kind of like the supply list yesterday..... I was able to accomplish about 80% of what I set out to do.
That was my first step backwards. The second step backwards was of course something that I had predicted yesterday.... I once again had very few of the supplies that were needed to make this tag. At least everyone else seems to be in the same boat as me so I have plenty of company. And there was the one thing on the supply list that nobody had... The background stamp that Tim used hasn't even been released yet. I mean COME ON.....REALLY!!!! Well I for one wasn't letting that get in my way, realistically I probably wouldn't have owned it anyway even if it was available. That's just the way things have been going.
Instead I used this huge stamp that I have from Harmonie. It's a section of a doily and it measures 5.5 inches by 8.5 inches so it was definitely going to cover my whole tag :) I didn't have the candle die either and truth be told I don't remember ever seeing it before! So once again I cut the candle out by hand. I am getting to be such a pro at that.
Cut the foliage out of the same dies that I've been using all along (But I must admit that I may just break down and buy that one before Christmas) and then just used the dies that I have to do the word Peace. My letters don't look quite as nice as Tim's but at least they spell Peace!! The flourish that I used was cut from a Boss Cut die that I have. Overall I think the effect was pretty close to what Tim did.
And now for my one step forward.... I'm going to go and link my picture on Tim's site and wait for day Ten of the twelve tags of Christmas.

Thursday 8 December 2011

I Had Such Fun Today!

I think that I'm probably one of the last holdouts who hasn't bought seam binding. I just can't seem to bring myself to buy any when I have tons of ribbon that I barely use.
But enough of that .... Today I actually had most of the items that were used .
I had the stamp with the guys on it and I had the stamp of the pointing finger, but the stamp set that has my guys on it doesn't have the other steam punk stamps on it. I'm not sure why that is but for some reason it doesn't.
Anyway I didn't let that get in my way. I pulled a couple of other stamps and did the background technique with them I think the worked just fine.
Then I cut out the gears ( and surprise I had that die so I didn't have to hand cut those things) but alas much to my dismay I don't have the clock die. So I used my masks as a template and cut one out by hand.
I also don't have the tiny attacher so I used a big utility stapler that I have. The staples are pretty big but I think it actually adds to the steam punk theme.
I don't have the same embellishments so I just went through my stash and finished it off with those.
Personally I think that the whole think turned out pretty well...
Yep...today I actually am pretty relaxed cause I didn't have to try and figure out so much over this tag....
But I'm sure that it is only a temporary reprieve. Tomorrow I probably won't have any of the stuff that I need and I'll be back to trying to figure out how best to achieve the effect without buying anything new.

Wednesday 7 December 2011

What can I say????????

Today when I opened my web browser and beheld the beauty of today's tag I actually caught my breath. Then when I read the list of supplies I almost put my head down and wept....... I actually have glassine paper and I know where it is!!!
I got started right away on alcohol inking the paper and drying it, but of course I don't have any dies that cut holly leaves so I painstakingly cut out my leaves. I was so involved with everything that I was doing that I almost forgot that I was supposed to be at a friends house for 1 ish. It was difficult for me to do but I left the safety of my craft desk and headed out into the cold. At some point during my absence though a couple of my holly leaves went missing...... I can't be 100% sure but I'm 99.9% sure I know who the guilty parties are.
Again I have some distress stains but of course not the right colours........ is there ever going to be some aged mahogany or some Victorian velvet used? Is that asking too much?
So once again I pulled out my reinkers, I have pumice stone but I don't have antique linen so I substituted tattered rose. I then did the "ghost" stamping.... a technique at which I utterly suck! I then got some white beads out of my stash and used my alcohol inks to make them red.
I don't think that my fingers are ever going to be the same again......they are completely stained with various colours but I have to say that the red alcohol ink makes me look like I'm some sort of a serial killer.
I managed to get the whole thing together finally! I can't believe how many techniques Tim manages to fit into each tag. This has certainly been quite the challenge for me.


Tuesday 6 December 2011

Well this is it....Officially at the half way :)

This morning when I sat down to start on the sixth tag in the series I noticed that my craft area smelled strangely like Lifesavers Wint-O-green mints. It usually does have a scent of this because I eat these when I'm crafting, but today it seem stronger than it has in the past. So I started moving things around to see why and it soon came clear the reason behind it. My youngest cat (she is only 7 months) was reaching into the bag and making off with them. As she pranced away with one of the conveniently individually wrapped candies I ran after her. She of course thought that this was a great game! I suspect that this may be payback for the jingle bell incident earlier this week :)
Anyway once I reclaimed my booty from my cat I got down to work on my tag. Of course as is typical I don't own any of the products that Tim was using today.....But I'm not letting that stop me. I didn't have the foil tape so I used the thinner piece of Making Memories Metal sheets.(I'm not sure why I have that in my stash but lucky for me that I did )  I backed it with a large sheet of score tape that I have and then stuck it to a piece of white cardstock. My cuttlebug embossing folder called Christmas Countdown made an encore performance on this tag. Then I used my acrylic paints and painstakingly painted different colours all over the tag.
I have a few tips to impart among you.
1. Wait till the paint dries before burnishing it. If you don't then you might as well have not painted it at all. I learned this the hard way!
2. When Tim tells you that you should wait for the embossed piece to cool down before moving on to the next step it is a good idea to listen. This too I learned the hard way :(
and the third and final tip of the day........
3. Turning on your embossing gun will scatter your cats faster than turning on the vacuum cleaner LOL!
Anyway............ I finished up the tag with some red ribbon ( I really like the red ribbon) and a trinket from the  industrial chic line. I think it looks like an old toy car so it totally suited the tag IMHO.

Monday 5 December 2011

I Don't Know What I was Thinking But..........

When I saw today's tag I thought "Eureka .... A tag that I should have no problem making!!!!" And then the realization set in. This tag is really really really deceiving in its simplicity. I was okay with the fact that I didn't have the exact same colour of alcohol inks, I had enough different reds to make me happy. I was even okay with not having the backwards stamp, after all I have some nondescript stamps that it wouldn't matter that they were actually stamped backwards. No one would know. And as for not having the same brand of acetate so what, Tim says that my packaging stuff is just fine. And as for not having that laurel leaf die, I've become so adept at faking the greenery using the dies that I have that I'm quite nonchalant about it....."Oh that old greenery, that's just something I whipped up...La Ti Da"
What I wasn't prepared for was how much I really and truly suck at this technique. Oh My God! What was I thinking? Try as  I might it just wouldn't work the same way for me. The pictures on Tim's blog make it look like its so easy. Every time I tried to blot the ink up from the alcohol ink I just made a bigger and bigger mess. So I would take my blending solution and wipe off the back of my tag and start from the beginning. Finally I conceded defeat and just went with "pretty close" as long as I squint and turn my head sideways.
As for the colour of the leaves in my wreath I didn't have the ranger dabber paint in lettuce , but I did have Making Memories acrylic paint in celery. I figured both of these greens were from the same food group so they must be interchangeable.
Instead of a white ribbon on the wreath like Tim used I put a red one on. This I did with the soul intention of drawing your eye away from my so/so background technique. Works for me ! ;)

Sunday 4 December 2011

Can You Guess Whether I had the supplies?

I would be lying if I said that I woke up this morning and discovered that magically I was transported to a place where I had all the right supplies to make todays tag.
Okay admittedly I haven't invested in any of the seasonal dies but lets face it... I personally have trouble spending money on stuff that I may only use once. That being said I still want them all and I found myself at my favourite online scrapbook store with them in my cart. But then sanity prevailed and I emptied my cart walked over to my craft desk and started to figure out how to go about best achieving this tag without all the right supplies.
I must say that I'm getting really good at thinking outside of the box ( pause as I pat myself on the back LOL!)
To start with I have some of the distress stains but of course I don't have the right colours. Well except for the picket fence. But I do have a load of reinkers so I pulled out my weathered wood and my broken china and put a small dot each colour on my craft sheet. Then I added about 4 times more water to it. Put down some of the picket fence distress stain, watered down by tag and proceeded to drag it through the ink on my craft mat. If I do say so myself I think that the background ended up looking very close to the one that Tim did.
Just like the deer in tag number two I traced out and hand cut the snowman and the snowflake.I then used some stencils that I have and traced out the 25 and cut them out with my craft knife. I don't have a dabber in white so I just painted it with white acrylic paint. Once it was dry I covered it in the rock candy distress crackle paint and waited for it to dry.
I know that it will come a surprise to most people but I do not  have the snowflake on the edge die. But I do have the scroll  one so I used it. I figured that it would give the feeling of wind to the whole project. For the inking of the snowman I once again made my mixture of one part reinker to 4 parts water. Then I used my inking tool with a fresh sponge on it and dabbed it onto the dry snowman.. The rest is just embellishments from my stash. I think that it all turned out pretty close to the original. YAY!!!!!!

Saturday 3 December 2011

This is getting ridiculous

It would seem that my posts all have a common theme going... and I don't mean that they are all about the twelve tags of christmas but rather that they are all about the supplies that I don't have :)
Once again I was lacking in the supply department. Even though I had all the reinkers I don't have any cut n' dry felt. Now you think that I would have gotten some cut n' dry at some point since it is a favourite technique of Tim's and I've actually wanted to try it , but of course I just haven't gotten around to it.
So I diligently inked each section of my stamp with different colours of distress ink. And then I huffed and I puffed and I stamped that stamp down. Then I ran an edge embossing folder over the bottom of my tag to give a little dimension. The greenery is again from an assortment punches and dies that I already have. Since I don't have the perfect pearls spray I made due with putting some of the acrylic gold dabber paint and some water in a mini mister and spraying my tag with that. Somewhere in my house is a bag of jingle bells but of course I couldn't find it. They are probably hiding with my sticky back canvas LOL! So I robbed my bell from one of my cats toys. They looked a little confused when I was shaking the toy but a crafter has to do what a crafter has to do.
Even though my tag doesn't look like Mr. Holtz's I still think that I managed to capture the flavour of the tag.

Friday 2 December 2011

Day Two.....and going strong :)

So I'm beginning to think that the twelve tags of Christmas should be renamed "So you thought you had plenty of Tim Holtz products guess again"
Once again I discovered how truly lacking I am in that department. But at the same time I stare at the plethora of stuff I have and I fight back the urge to go and get myself some new stuff. LOL! My mantra has become "It's not about sameness it's about inspiration"
First off I didn't have the kraft resist christmas papers (I have the Halloween ones but I don't think they are interchangeable, do you?) so I went about creating my own form of kraft resist. I started with some plain kraft cardstock and stamped on it in archival sepia ink. Then I used my versamark and stamped the sentiment "deck the halls" and embossed with clear embossing powder. I have the picket fence distress stain so I was good to go there. Next came the deer. I don't have that die (Surprise!) so I traced out and hand cut it . I do have sticky back canvas but alas I have misplaced it so I used some mulberry paper to cover the deer and to feather out the edges with my wire tool (Shocker ... I have that tool). Next I distressed and inked up the edges with brushed corduroy because I like the gold tones that it has. I then cut out some grunge paper using my ornate on the edge die (again something I already had) painted it with gold dabber paint, put some small brads in and voila!  The green wreath around the deers neck is just some wool fibre that I had in my stash that I painted with some green ink.
And now (drum roll please.......)

Thursday 1 December 2011

So Here Is My First Tag

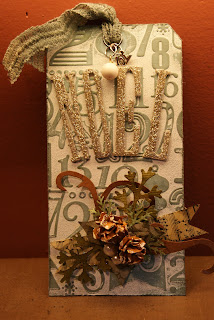
Even though I thought that I had a good supply of Tim Holtz's dies it turns out that I didn't have any of the ones that he used for today's tag. Correction, I did have the one to cut the actual tag out :)
Anyway I didn't let that stop me, after all this is supposed to be about being inspired and not about copying things exactly. Right?
So I went to work trying my best to create something similar to Tim's tag with the products that I had in my stash. First off I used just regular cardstock since I didn't have the kraft cordinations stuff. I dry embossed it using a cuttlebug embossing folder called Christmas countdown.( I figured that any one would do but I wanted to keep it Christmassy) Anyway on I plugged. My pinecones were made using the smallest flower off of the tattered floral die and if I do say so myself they turned out pretty good. The leaves are just an assortment of punches and dies that I have and I just hand cut a banner out of some music sheets that I have.
It was the word NOEL that almost drove me crazy, I tried various stamps but nothing seemed to look right to me. Finally I busted out some grungboard letters that I have and glittered them out.
So without further ado here is my take on the first day's tag.

Where to begin

So I've decided to start a blog. I'm not sure if I'll be successful at it but for what its worth it's begun. LOL
The reason that I started this is so that I can hopefully share my take on the Tim Holtz 12 tags of Christmas.